


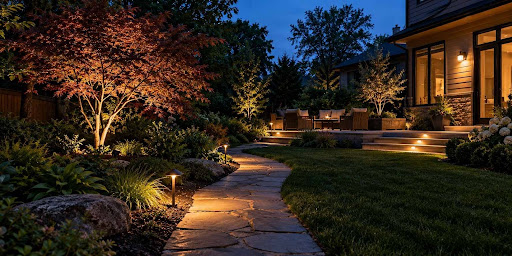
A backyard can feel inviting after sunset without lighting every tree, path, and wall at once. A few well-placed garden lights can help people see where they are walking, draw attention to a favorite feature, and make a patio feel connected to the house. The key is to give each light a clear job.
Start by looking at the yard from the places you use most: the patio, kitchen window, back door, and main path. Notice which areas need visibility and which features you would like to see after dark. This gives you a plan based on how the space works, instead of a row of fixtures chosen only by appearance.
Give each layer a clear purpose
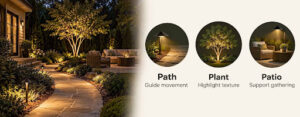
A balanced backyard lighting plan usually combines a few different roles. Path and step lights help define walking routes. Accent fixtures can reveal the texture of a tree, planting bed, or garden wall. A modest amount of light near a seating or dining area can make it easier to use that space after dusk.
These layers do not need to be equally bright. Path lighting may be functional, while a tree or wall is simply an accent. If each feature receives the same attention, the yard can look flat and overlit. Choose one or two focal points and let other areas remain dimmer.
A simple plan might include:
- Path layer: Mark a route from the back door to the patio or garden.
- Accent layer: Highlight one distinctive tree, textured wall, or planting bed.
- Gathering layer: Add comfortable light near seating, steps, or an outdoor table.
- Dark space: Leave some areas unlit so the brighter features have contrast.
That last layer matters. Darkness is part of the composition, and keeping some of the yard dim can make the overall scene easier on the eyes.
Start with the path people actually use
Walk the yard at dusk and identify the route people take most often. It may run from the back door to a patio, continue to a garden shed, or connect the driveway to a side gate. Mark changes in level, steps, corners, and obstacles that may be hard to see in low light.
Path lights should help people read the route, not create a line of glare. Aim light toward the walking surface and consider how each fixture looks from eye level. If the fixtures are too bright or too close together, the path can feel harsh. If they are spaced too far apart, dark gaps may make the route less clear.
Placement depends on the fixture, path width, surrounding plants, and how the light spreads. There is no single spacing rule that works for every yard. Lay out a few fixtures temporarily, then view the path from its entrance and from the areas beside it. Make adjustments before final installation.
For steps, focus on the treads and edges people need to see. Lighting should help reveal the change in level without shining directly into someone’s eyes as they approach.
Highlight plants with restraint
Plants can take on a different character at night. A tree with textured bark, a sculptural shrub, or ornamental grasses may create more visual interest than an entire bright flower bed. Choose a feature that has a recognizable shape or texture, then test how it looks with a small amount of light.
Low-angle lighting can emphasize bark or leaf structure, while a softly lit wall behind a plant can create separation from the background. Hide the fixture where practical, and check the view from both the patio and nearby windows. A light that looks subtle from one angle may be distracting from another.
Consider how the planting changes through the year. A deciduous tree may have a full canopy in summer and an open branch structure in winter. Aiming the fixture toward the main trunk or a stable garden feature can make the design work across seasons.
Outdoor light also affects neighbors and wildlife. The Royal Horticultural Society advises keeping garden lighting low and directing it across paths rather than into the sky. DarkSky International and the Illuminating Engineering Society similarly recommend using light only when useful, aiming it where needed, limiting brightness, using controls, and choosing warmer-colored light where possible.
Make the patio feel connected to the house
A patio often needs a different kind of light from a path or planting bed. People may want to eat, talk, or read outside, so consider where the light will land on the table and seating. Avoid placing a bright fixture where it shines straight across the seating area or toward the house.
Instead of lighting the whole patio evenly, start with the specific areas people use. A step light can make an entrance easier to see. A wall fixture can provide a gentle background layer. A focused light can help with a task such as preparing food, if its placement avoids glare and suits that purpose.
Look at the patio from indoors as well. Backyard lighting is part of the nighttime view through windows, so a bright fixture aimed outward can dominate the view or spill into a neighbor’s yard. Shielding and careful aiming help keep light on the intended surface. NPS outdoor lighting guidance also emphasizes lighting only the area needed, reducing spill, and using the lowest level appropriate for the task.
Choose fixtures for location and effect
Fixture style should follow the job. Pathway lights direct light along routes. Spotlights and floodlights can accent selected landscape features, though their beam size and aim should suit the target. In-ground fixtures can create a less visible source of light, while step and deck lights can be integrated near changes in level or seating areas.
The AQLightingGroup garden and landscape lighting includes pathway, area, spotlight, floodlight, in-ground, and step or deck fixture types. Compare product details such as voltage, mounting method, light distribution, materials, and location rating. Confirm the specific fixture is suitable for its intended exposure and installation.
If you are mixing fixture types, check that the visual effect feels coherent. Several different housings can work together when they serve distinct purposes, but too many styles may make a small yard feel cluttered. You can keep the design unified by using a consistent finish or color temperature across fixtures that appear in the same view.
AQLightingGroup provides a range of fixture styles for outdoor projects. Their category is a useful place to compare types, while each product’s specifications should guide the final selection.
Review the scene after dark
Once fixtures are in place, look at the yard from the main viewing points. Check the back door, patio seats, kitchen window, and the start of the path. Look for harsh hotspots, visible glare, dark gaps, or light spilling onto a neighbor’s property.
Adjust the aim or reduce the amount of light if one fixture dominates. A timer or other appropriate control can limit when lights operate. Responsible outdoor lighting guidance recommends using lights only when needed, targeting them carefully, and avoiding more brightness than the task requires.
Then check the system after plants grow or furniture moves. Shrubs may block a beam, and a new seating arrangement can put a light directly in someone’s line of sight. Revisit the layout seasonally and keep lenses and fixtures clear according to their care instructions.
The best Landscape Lighting plan is one that makes the yard useful and enjoyable while preserving contrast and comfort. Start with the routes and features that matter most, then select fixtures that suit those exact locations. AQ Lighting offers garden and landscape options for homeowners and contractors to compare. Review the product details, map the layout, and make the light serve the space.
FAQs:
- How many garden lights should I use in a backyard?
It depends on the size of the yard, the routes people use, and the features you want to highlight. Begin with the areas that need visibility, then add only the accents that improve the view. - What is the difference between yard lights and landscape lights?
The terms are often used broadly for outdoor fixtures. Product types and intended uses vary, so check whether a fixture is designed for paths, steps, plants, walls, or another location. - Where should backyard lights be placed?
Start with commonly used paths, steps, entrances, and gathering areas. Add accent lighting only where it highlights a feature without creating glare or unwanted spill. - How can I reduce glare from garden lighting?
Aim light toward the surface or feature you want to illuminate, and check the view from eye level and nearby windows. Shielded fixtures and lower light levels can help keep the source from shining directly at people. - Should landscape lights stay on all night?
Not necessarily. Timers, motion controls, or other suitable controls can limit light to the hours when it is useful.

