


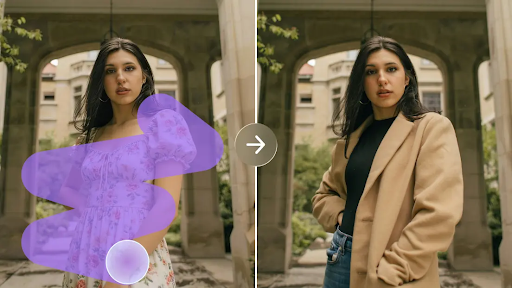
AI inpainting allows for the replacement or modification of specific regions of an image without having to recreate the whole image. It can be used to fix photos, eliminate clutter, alter garments, and clean up backgrounds while keeping valuable original details. You don’t have to manually rebuild all the impacted areas, but you direct AI toward a particular visual change. Dreamina AI includes image generation along with editing features such as Inpaint, Retouch, and Remove (where available). The key to success is a series of very specific selections, clear prompts, and attention to detail in the resulting image. Knowing these basics helps to make localized editing more predictable, controlled, and consistent to look at.
Understand How AI Inpainting Works
The AI inpainting process is simple and can be broken down into four stages: selection, contextual interpretation, generation, and integration. First, you select the area you want to change by selecting the area with the selection controls. Then, the model infers from your commands the surrounding colors, textures, objects, and spatial relationships. It then creates new content to replace the area chosen. Lastly, you review the integration of the new content into the composition. Inpainting can be used to add completely new content, unlike object removal, which is used to remove unwanted content. Retouching enhances the details that are selected, and Expand creates new images outside the boundaries. Depending on the interface and model, Dreamina AI offers separate editing features. However, generated replacements can add inconsistencies, and complex edits can sometimes take multiple tries.
Identify the Right Areas to Edit and Define the Intended Change
Before editing, decide what you want to change and what other information you don’t want to alter. The AI Image generator can assist in generating visual content, and region editing allows for targeted modifications. For unwanted objects, choose the distraction without taking in other objects that are close to it. Backgrounds should replace the background scenery of the subject and preserve the outline of the subject. When making clothing modifications, it’s important to have clear parameters for clothing, skin, and overlapping accessories. Facial corrections should be limited to minimize any unwanted alterations in identity or expression. Nearby highlights and shadows must be taken into account for lighting adjustments. If the scenery is incomplete, choose sufficient contextual elements to suggest a reasonable restoration. Too narrow a selection will leave some parts of the image; too broad a selection will destroy good detail.
Write Inpainting Prompts That Respect the Existing Image
A good prompt clearly communicates what the desired transformation is, but does not leave important visual decisions unclear. Four elements: target, replacement, context, and preservation requirements. Specify exactly what object or area is being referred to, what its appearance should be, and how it should relate to surrounding areas. When applicable, indicate lighting direction, perspective, material, color, and style. For instance, instead of “Change the background,” you can say “Add a nice soft beige studio background with some nice even directional lighting and natural contact shadows. Include directions to maintain the original shape, location, dress, and expression of the subject. With descriptive prompts and reference images in supported workflows, Dreamina AI facilitates visual intent communication. But instructions for preservation guide generation and do not necessarily ensure pixel-perfect consistency.
How to Inpaint Any Area Cleanly with Dreamina?
Step 1: Describe the Area You Want to Inpaint
- Start by signing up or logging in to Dreamina so you can begin inpainting photos.
- Click the “Create” tab on the left menu and then select the “AI Image” option.
- Type a detailed text prompt describing the edit area, its elements, theme, and concept clearly.
Step 2: Set Model Options and Generate the Edit
- Look at the bottom of the dialogue box and choose an image model from there.
- Choose Seedream, GPT Image, or Nano Banana, whichever model suits your precise inpainting edit best.
- Add a reference image to help the edited area look more precise and perfectly natural.
- Select a matching custom aspect ratio and resolution from the “Aspect ratio” and “Resolution” tabs.
- Select the number of variations in “Images to generate” and set custom dimensions in “Dimensions”.
- Use the “Draw text on image” tab to add any text inside the edited area.
- Finally, click the “Generate” tab to begin the inpainting process on your selected image area.
Step 3: Blend the Result and Export the Image
- Dreamina then shows you the required number of drafts, with your selected area neatly changed. If the edit looks uneven, click “Edit prompt” or “Regenerate” to refine the generated results.
- You can also upscale the generated image using “Creative upscale” to sharpen the repaired area.
- Moreover, use “Retouch” to correct, clean up, or enhance edge details of the selected image.
- Use “Remove” to erase anything from the image, or use “Expand” to grow the canvas.
- If you want to animate your finished image, use the “Generate video” tab.
- Dreamina gives you complete freedom to edit every image area exactly the way you like.
- Finally, click the “Download” tab at the top right to save the final edited image.
Match Edges, Lighting, Texture, and Perspective for Cleaner Results
A successful edit is one that is congruent with the image that it is surrounded by, not just a cut of the requested object. Examine boundaries for visible seams, halos, abrupt transitions, and remnants of removed elements. Look for highlights and shadows to ensure a consistent direction of light. Compare perspective, object size, and distance to the original scene. The sharpness, the graininess, and the level of detail in the material of a texture should be similar to that of the adjacent surface. Colors should stay in harmony in terms of temperature, contrast, and saturation. Check contours where objects overlap or meet as well. Larger selections can be useful to avoid unwanted changes, but more complex repairs may require larger contextual selections. Zoom in on the edited area to see if any minor flaws may be missed when viewing at regular size.
Troubleshoot Common Inpainting Problems With a Structured Revision Process
If an edit has been made to the wrong object, further define the selection and make the object more explicit. If edges appear unnatural, tweak the edges and specify matching textures and lighting. When prompts are given that indicate shape, orientation, scale, and position, distorted replacements often improve. There may be a need for more explicit directions with regard to depth, perspective, and materials around. When unwanted objects or features occur repeatedly, remove the unnecessary prompt information. If there is any important detail that is lost, check other generations and edit the area. Do one thing over and over: check the result, find one defect, tweak the appropriate instruction or choice, and re-generate. This approach provides a more systematic way of troubleshooting and minimizes unnecessary revisions.
Preserve Image Quality, Context, and Editing Responsibility
Leave the original untouched so that comparisons can be made during the editing process. Review the final image at normal magnification and size for reflections, shadows, relationships of objects, and details in the background. Ensure that the resolution and file type being exported are appropriate for the platform you will be using. When editing third-party images, take into account copyright, ownership, consent, and usage rights. Do not include details that have been rebuilt as real evidence in the documentary, journalism, or factual field. While Dreamina AI can streamline creative revisions, it is important to note that the content produced by the AI may need human verification in professional settings where accuracy is critical. The careful review ensures the quality of the image and the final output.
Conclusion
Proper selection, carefully crafted prompts, and seamless contextual blending are essential for clean inpainting. Dreamina AI offers a creative space for editing and improving images without the need to start from scratch. When using these tools, it is important to understand the difference between Inpaint, Retouch, Remove, and Expand. Check boundaries, lighting, perspective, and texture before exporting the final result. Most importantly, remember that each generation is a draft that needs to be carefully reviewed. Maintaining visual context in the original image is as important as creating compelling replacement images.

